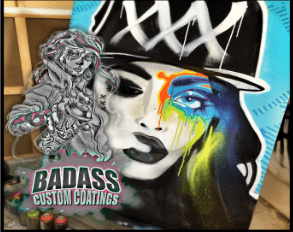
Why do I have hydrographic dipping failures with custom printed or standard printed films?
Many people attempt hydro dipping at home, but some problem always occurs and custom printed or standard films and it can be a bit tricky. In this article, BADASS CUSTOM COATINGS will tell you why do you have hydro dipping failures and give you a relative solution at the following points.
1. Pattern with wrinkles or folds
If after dipping with custom made film, the finished product has wrinkles in the pattern after dipping, it would be caused by the custom water transfer printing film doesn’t have enough dissolution time, you can solve this problem by delaying the dissolution time of custom film for a better 3D water printing effect. If by “folding” you mean the film folded on itself before activating, then you need to open up your dams and let the film spread out as it hydrates. Use dry fingers to spread the folds before it gets too soft and splits when you touch it. If the folds come after activation, then it’s still under activated and part of the film is not yet a liquid.
2. The pattern is blurred
If there is an occasion in which your water transfer printing products has a blurred pattern, which expresses your hydro dipping paper dissolution time is exceeded, please shorten dissolution time in the process of the soak time. Or set your water temperature correctly most all films require 90 degrees, 60 second soak 10 sec dwell.
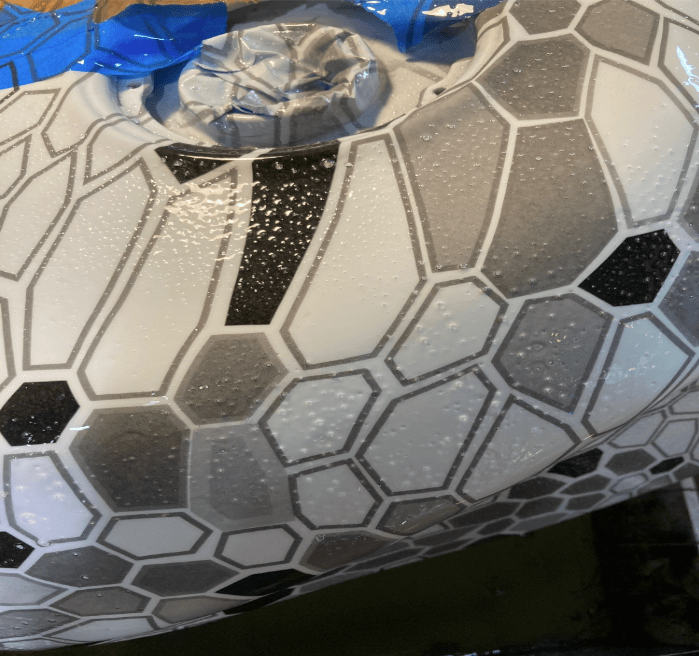
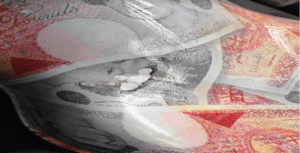
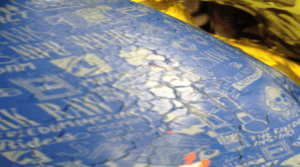
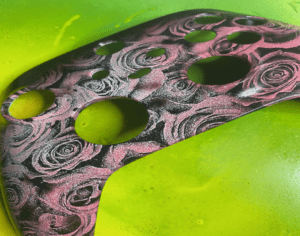
3. The film has bubbles and holes after dipping

In the first picture this would rule out under activated and trapped air because it’s almost even all the way around the tank. A few things could be wrong here. Maybe it’s a reaction (low probability) between the basecoat and the activator. Also, possible is that your air supply is saturated with water so much that it’s injecting water into your activator spray pattern. The very last idea I have as to the cause is a very rough basecoat microscopically piercing the film and causing those bubbles. So, with this regarding the paint roughness. Take some 600 grit and smoothed it all out before dipping it and it turned out great.
4. The pattern flows
The pattern will flow, if you spray activator B excessively during the process of water-ink transfer printing, reducing the amount of activator sprayed can solve the problem.
5. The pattern is not printed completely
There are several reasons for incompletely painting of speed shape of items: uneven activator spraying, high environment temperature or high-water temperature, over fast evaporation of activator.
Spray the activator evenly, lower the temperature of the water, adjust a comfortable room temperature, or prevent high wind from coming into the room to avoid the activator evaporated.
If you have enough in your budget for your hydro dipping business, and you want to set up your game I suggest our BADASS CUSTOM COATINGS hydro dipping tank, this can avoid incomplete hydro printing problem perfectly.
6. Blisters and jagged holes on products’ surface
If you find there are blisters or jagged holes on the finished products’ surface, then you’re not spraying enough activator and also the product has a wrong angle to get into the water to do water transfer ink printing. So please adjust your activator spraying and change the direction and angle of the product entering into the water. Even watch your activator spraying angle as well!
7. Poor adhesion of pattern after hydro dipping
If your material has oil on the surface or the base coat is still wet, the finished product will occur poor adhesion of pattern after water transfer. So please make sure the material is cleaned thoroughly, base coat is dry as well pay attention to whether you have done well about points 2 , 3 , 4 as above. Try our hydrographic paints, which is formulated just for hydrographic for better success
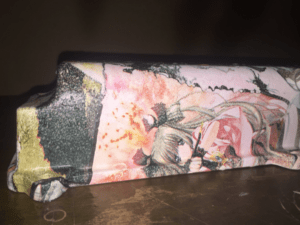
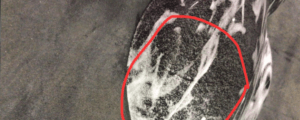
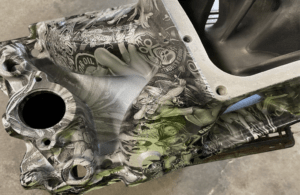
8. Stretching and lines in films after dipping
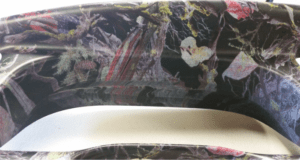
If your seeing lines like first picture, those are hesitation lines not stretching, this would have been fine with fluent non-stop motion, some parts need back fed to get a good hit. The second picture shows stretching the film. Film can only go so far before stretching is inevitable, sometimes its best to cover areas with a sold color.
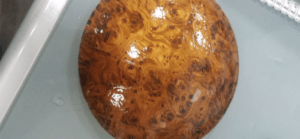
9. Film has fish eye after rinsing

If your film has the appearance of fish eyes or oil on water look, this would be due to some sort of cross contamination or water spots on film, also water in airlines is a common and a water/oil separator on you line should be added, or be activator dripped while spraying, or dripped on it after the print dried.
10. Material is blistering or cracking before or after topcoat is applied
If there are blisters and crack on the material’s surface after topcoat is applied, which express that the material has low solubility and the drying time is too short after the base coat is applied. You should choose another topcoat solvent to replace the old one or delay the drying time of the base coat for a better liquid ink hydrographic effect. Also try our premium topcoat clear coats specially formulated for hydrographic in all finishes
11. Poor adhesion of the topcoat
In first picture, likely if it was an aerosol, you were spraying too close and the propellants stripped the color out. If the topcoat can not be bonded with the material, maybe the base coat and topcoat do not match or the topcoat does not match the material. You should choose other paint to replace them. Try our line of specially made Hydrographic paints for better success.
12. Topcoat turned yellow after drying
A. Drying time is too long and over high temperature also will cause this situation. If you lower the temperature and shorten the drying time setting on your drying tunnel machine, but this situation does not have any improvement, please replace this yellow paint.
B. A thick and uneven topcoat painting at the corner of the product, will also cause the topcoat painted yellow after drying. If you want to solve this problem, it is OK to reduce the amount of topcoat spraying.
This solution can help you solve the above problems in hydro ink transfer. I wish this article can help you make perfect hydro dipping products with your love water transfer film. Otherwise, if you had met other problems in the process of water-ink transfer printing, you can leave your questions and send an email to CONTACT US.